How To Make a Roux Tutorial: Examples and Photos
Since chefs use a roux so often in French cuisine, it makes sense that it is a French word. However, this technique can be (and is) used in cuisines all over the world. Making a roux (pronounced “roo”) doesn’t have to be intimidating or scary, and it can improve your dishes by leaps and bounds.
This article will walk you through the process of making a roux, step by step. Read on to learn more!
What Is a Roux?
A roux is a hot liquid made on the stovetop that can be used to thicken multiple dishes. Luckily, this helpful combination is quite easy to make. All you need is equal parts flour and fat and a high-quality saucepan.
Usually, a roux is prepared with all-purpose flour, but you can get a bit more creative when it comes to the kind of fat you use. Anything will work in this situation, from butter or lard to canola oil. That being said, keep in mind that each fat has its own smoke point, so it might take longer or shorter to cook.
If you are all out of flour, or if you’re looking for a gluten-free alternative, you can substitute cornstarch into your roux recipe in a pinch. To do so, combine cornstarch with water to make a slurry. Then, you can put it in the pan with the fat.
There are multiple different types of roux, all of which are particularly useful in specific recipes. You achieve different kinds of roux by cooking it for different amounts of time. Depending on the recipe, you could make a white roux, brown roux, or dark roux. While similar, they all have their own unique tasting notes and flavor profiles.
Generally, the darker the roux is, the more pronounced its nutty flavor becomes.
When Should You Make a Roux?
Once you perfect the art of making a roux, you might want to create one all the time.
They are not always necessary, though, so be sure that you’re only including them when the recipe calls for one. Otherwise, your dish could end up with an odd texture. If you are making a liquid or partially liquid dish that could use a thickening agent, that is when a roux is perfect.
Some of the most famous sauces that start by making a roux are:
- Béchamel Sauce
- Various cheese sauces (macaroni and cheese, white sauces)
- Espagnole sauce
- Velouté sauce
- Sausage gravy
A roux isn’t only helpful for making sauces. All sorts of meals could benefit from its thickening power. They are also often included in dishes like gumbo and étouffée. In addition, a roux is a key ingredient in many other Cajun and Creole dishes. It’s also the center of many chowders, soups, and stews.
They are also particularly helpful when making gravy. Add pan drippings or stock, and you have a delicious, savory gravy that would look right at home on any Thanksgiving table.
How Do You Make a Roux?
Without further ado, here’s how to make a roux. We like rhymes.
Choose a High-Quality Pan
Even the best chef or home cook will falter if their cookware isn’t up to snuff. That’s why so many professionals and home chefs alike choose HexClad pans. All of our cookware is made using hybrid technology, so you can get the best of stainless steel and cast iron all in one, with a non-toxic, non-stick finish.
Something that is especially important when making a roux is the ability to use metal utensils on your cookware. All too often, especially with non-stick pans, you have to nix your metal utensils to avoid nicking your pan.
With HexClad pans, you can use metal utensils to your heart’s content without fear of damaging the integrity of the cookware.
The stay-cool handle makes it seamless to transition your pan on and off the stovetop. Since it’s induction ready, it’s compatible with all sorts of different ranges. No matter what stove it’s on, you can feel confident that it will conduct heat evenly throughout (other than the handle).
When you’re done cooking, you can pop it right in the dishwasher for ultimate convenience (you’re welcome).
Add Your Butter
Now that you’ve completed the all-important first step of spending several minutes staring at your pan in awe, it’s time to start properly making the roux. First, set your pan on medium-low heat.
Remember that you will be putting in the same amount of both flour and fat. For example, if you’re going to add one cup of flour, then you’ll also need one cup of butter based on the number of servings you’re making.
To make sure the amounts are staying consistent, it’s better to plan how much you’re going to use ahead of time.
Add Flour as Butter Starts To Melt
Traditionally, a roux is made with butter. As your added butter starts to melt, this is when you pour in the flour. The flour and melted butter will incorporate with the help of our next step.
Stir
As soon as the flour is in the pan, you should begin stirring fairly aggressively with a wooden spoon. Before you know it, the butter and flour will come together, forming a dough-like substance. Just because the ingredients are partially incorporated doesn’t mean the roux is done, however.
It’s crucial to cook out raw flour since it can taste bad or even pose a health risk. You need to keep stirring and heating the mixture for a total time of at least two to three minutes.
At that point, you will have a light roux. If your recipe calls for a darker roux, simply continue to cook it until it reaches the desired color. Keep in mind that the hot roux will continue to cook a bit even after it is removed from the heat, so take care not to overcook it.
Add Cold Milk in Thirds
Adding milk isn’t a requirement for making a roux, but it can help you on your way to making all sorts of sauces.
You should keep your milk in the fridge until right before you’re ready to use it. By keeping the milk as cold as possible, you avoid your roux from turning lumpy or clumping in the pan.
Pour in a third of your milk at a time, stirring in between each pour. Once it’s all incorporated, you can add the next third of the milk until it has all been poured in. For now, though, just start with the first third.
Take Your Pan Off the Heat If It Starts Cooking Too Fast
While a roux isn’t terribly complicated to make, it can be somewhat finicky. If you realize that the mixture is cooking faster than you want it to, that is a great opportunity to remove it from the heat.
Even when it isn’t directly on the stove, the roux will continue to cook just from the residual heat at the bottom of the pan. Well, assuming you have a thick pan that is excellent at conducting heat, like the ones from HexClad.
When the roux has sufficiently cooled down, you can put it back on the heat.
Switch to a Whisk
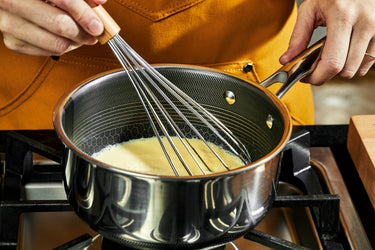
At this point in the process, add in the second third of your milk, and you also change your utensil of choice to a metal whisk. This is why it’s so important to have a pan that can stand up to metal.
The whisk will allow you to get rid of as many lumps in the flour as possible as you continue to pour in your milk and mix. Don’t be afraid of whisking too quickly. Whisk like you mean it.
Check for Lumps
Before adding the last third of cold milk, make sure that your mixture is creamy and lump-free. Once it’s smooth, add in the milk, and season it with salt and pepper to taste.
You can also put in a pinch of nutmeg if you’re feeling it, but no pressure.
HexClad: Hybrid Cookware for a Flawless Roux
Once you know how to make a roux, the caliber of dishes you can make skyrockets. Now that you’ve read our guide, you are one step closer to achieving greatness on your culinary journey.
Sources:
Thickening a Sauce With Roux | The Spruce Eats

